Mission Statement: Using DH Tools with (almost) no Installation Problems
DH2go is a server-based teaching and learning environment for courses and workshops in the Digital Humanities. It is in productive use at the DH department at the university of Stuttgart and under active development. Access is provided via shell or the remote desktop client X2Go. DH2go is our solution to various installation problems which regularly arise in our Digital Humanities M.A program at the University of Stuttgart when working with common DH tools. Students use many different systems, and different systems lead to problems which asked for support teachers could not provide due to time constraints and lack of experience. With the DH2go server, we provide research software, data for exercises etc. on the server side. Students and teachers need to install and configure only one piece of software, the X2go remote desktop client. This setup has reduced support time and installation problems on users computers significantly. All students now start out with an identical interface, which facilitates either mutual help among students and individual support by teachers.
The service is designed as a multi-user system, i.e. users can make indivdual settings, just like on their own desktops. These settings are retained across individual sessions (even the state of the desktop is retained after logout and readily available when logging in again). Users can install and run additional software within their userspace.
Teaching and learning materials can be provided by the teacher via a folder accessible to all students. Only the predefined seminar group has access to that folder.
We are already running the system as a service for our introductory course in Digital Humanities and for seminars located at the DH department. Our primary target group are introductory courses in Digital Humanities as well as courses with a practice-oriented DH aspect. We are working on making the system setup available for academic reuse (virtual machine, documentation and didactic background).
Why we don't just use the DHVLab service (but recommend everybody to consider it): We wanted server access (root) for independent software installation, a user management on campus, SSH access via local native CLI, and individual websites in a public_html directory for our course participants. We also wanted to use X2Go as our remote desktop solution. Our DH2go approach provides full control over the server and thus the possibility to meet specific requirements and to operate within our own infrastructure.
Technical Setup
The server is based on Debian Linux. It provides a LAMP stack (Linux, Apache, MySQL, PHP), R and python programming packages and the Xfce desktop environment with DH related applications. Access is provided exclusively via SSH. The remote desktop can be accessed with the X2Go-Client.
Applications
Server
- Debian Linux operating system
- Apache 2 web server
- MySQL (MariaDB) database management system
- PHP
- Terminal: Bash
Desktop Environment
- XFCE4 desktop environment (default)
- Xfce terminal and LX terminal (terminal emulators)
- Evince document viewer
Development
- Python 3 (various packages; extensible)
- R (various packages; extensible)
- IPython & Jupyter
- Spyder 3
- RStudio
- Geany
Text Processing
- Geany
- LibreOffice
- Pandoc
- TexLatex
- XML copy editor
- Oxygen XML editor (can only be used with a license)
- vim
Databases
- MySQL (MariaDB)
- SQLite
Visualization
- Gephi
- QGIS
- Python (various, e.g. matplotlib, seaborn, plotly; extensible)
- R (various, e.g. ggplot2, r2d3, plotly; extensible)
Features for DH teaching
- Helper scripts for course creation
- Separate "environments" per course (implemented via access rights)
- Course material folder in each user directory (maintainable by instructor)
- Publication of simple websites from user directory
- File exchange between users of a course
- Easy and secure data exchange between local machine and DH2go (X2Go feature)
- Common corpora in each user directory (planned)
Server Access
You can access the server via SSH. Access the remote desktop using the X2Go client (the main use of the server).
Data transfer via X2Go is possible as follows:
Clipboard: If you have enabled data exchange through the clipboard in the X2Go configuration, you can copy or move files, text, etc. from your local machine to the virtual desktop (and vice versa) through the clipboard using copy & paste.
Shared folder: If you have defined a shared folder in the X2Go configuration, data exchange is possible through this folder. You can find the folder in your DH2go under /home/USERNAME/media/disk/.
Alternate options to access the server:
Remote login via SSH terminal, e.g. using PuTTY (Windows) or SSH (Linux, MacOS)
Data transfer via SCP, e.g. using FileZilla (Windows, MacOS, Linux) or WinSCP (Windows)
Installation and Configuration X2Go
Before you can use the remote desktop, you need to install the X2Go client. You can find the installation file for your operating system on the X2Go project website.
Installation
Download the Windows client for your system:
Follow the installation instructions
Setup and Use
Start the X2Go client
Open the file → "New session" at the top left (Figure 1)
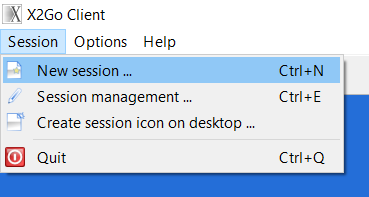
Figure 1: Create new session In the "Session" tab, please follow the instructions in Figure 2.
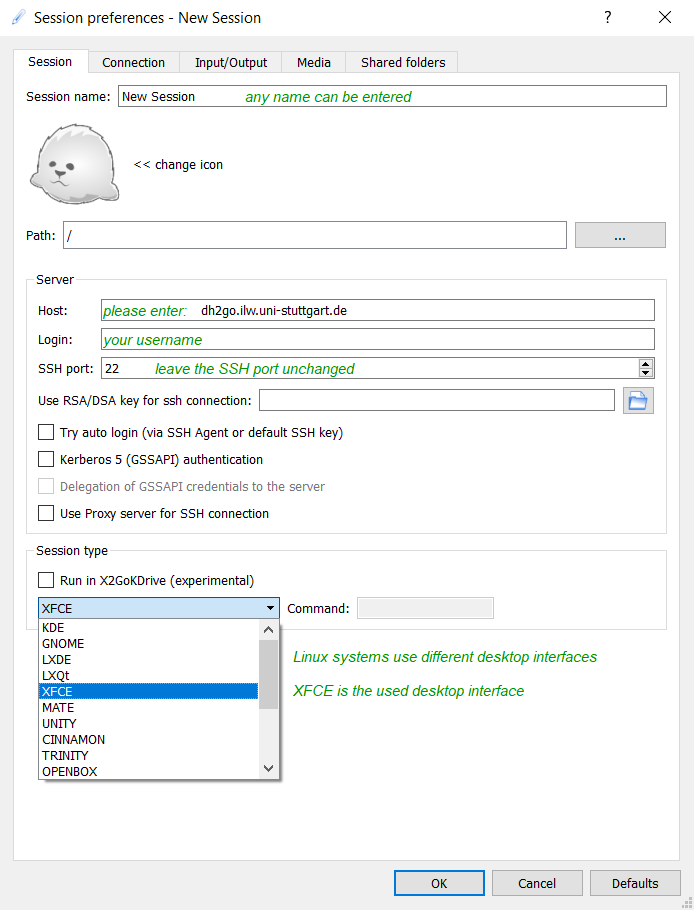
Figure 2: Set up a session X2Go occasionally crashes when running on Windows and switching from windowed mode to full screen mode and vice versa. To avoid this, please change the display from "Fullscreen" or "Custom" to "Maximum available" in the "Input/Output" tab. This leads to a (freely scalable) windowed mode with high resolution. In this tab you can also see the shared clipboard through which copy & paste is possible in both directions – you can do research on your home system and, for example, "take" code snippets to the DH2go server. (Figure 3)
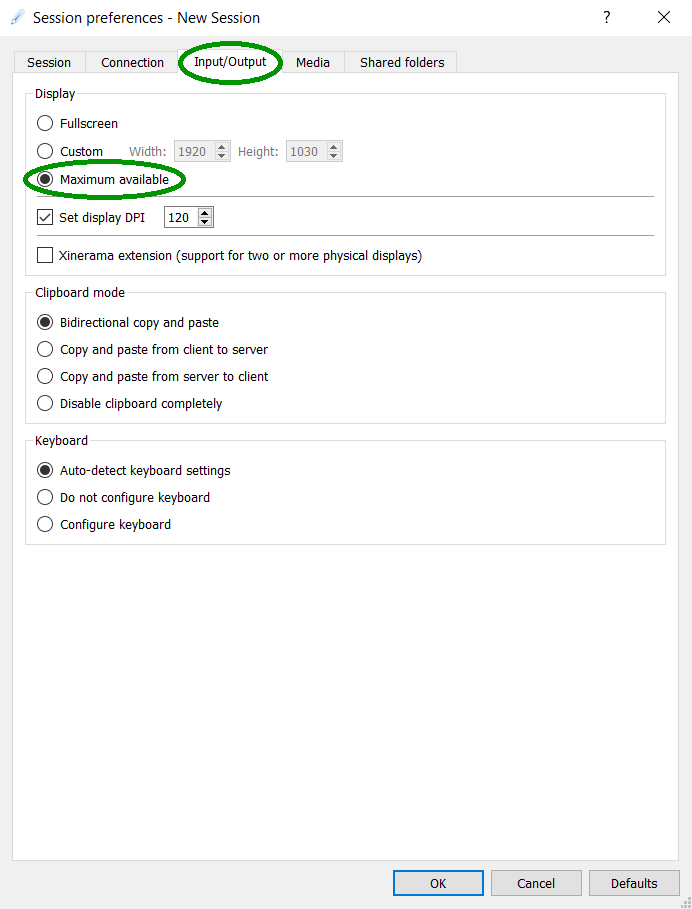
Figure 3: Adjust display You can increase or decrease the dpi as you wish. Figures 4 and 5 show examples of lower and higher dpi values.
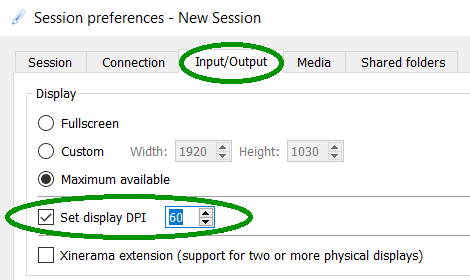
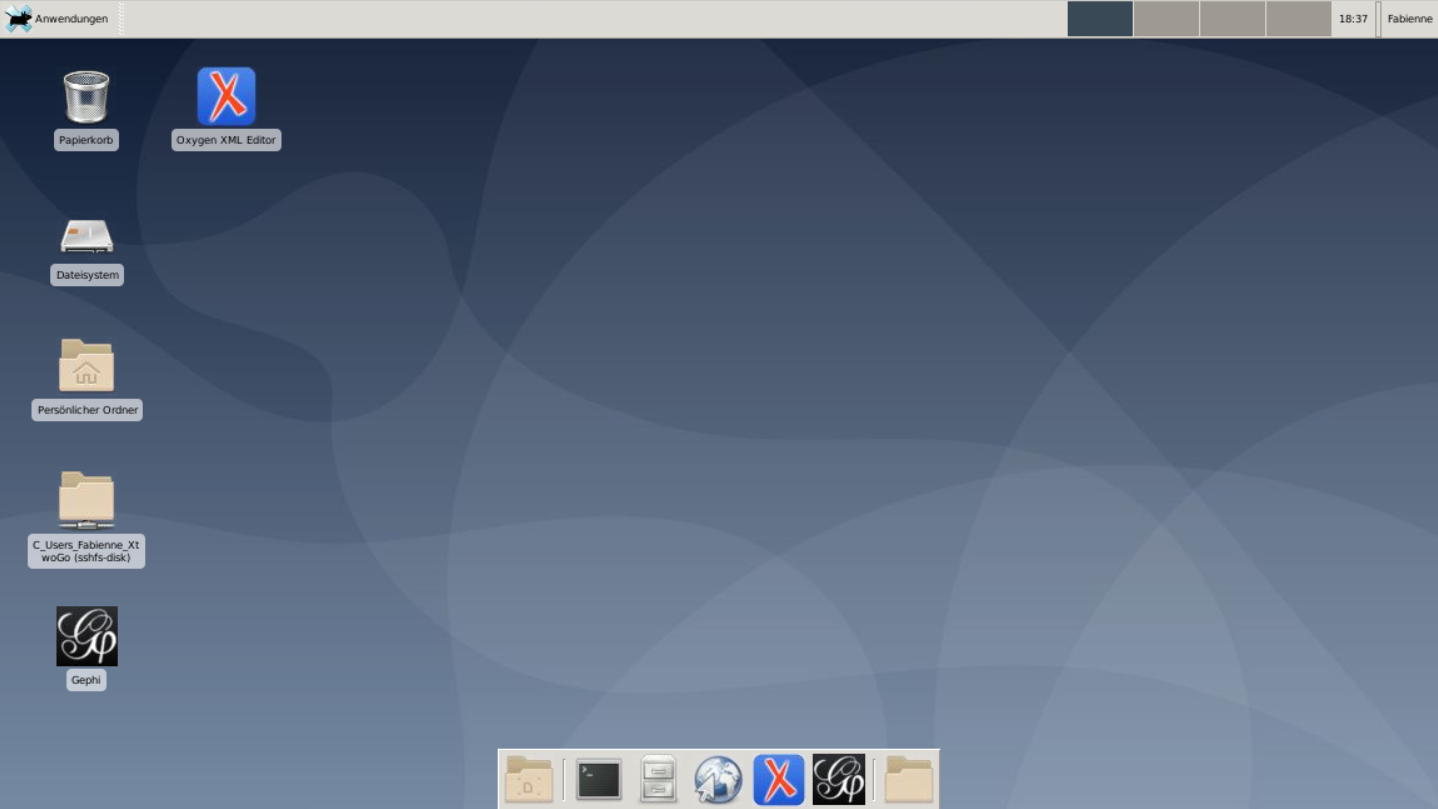
Figure 4: Example of lower dpi value 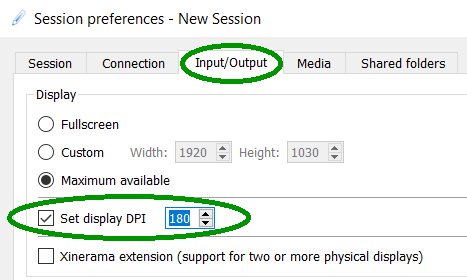
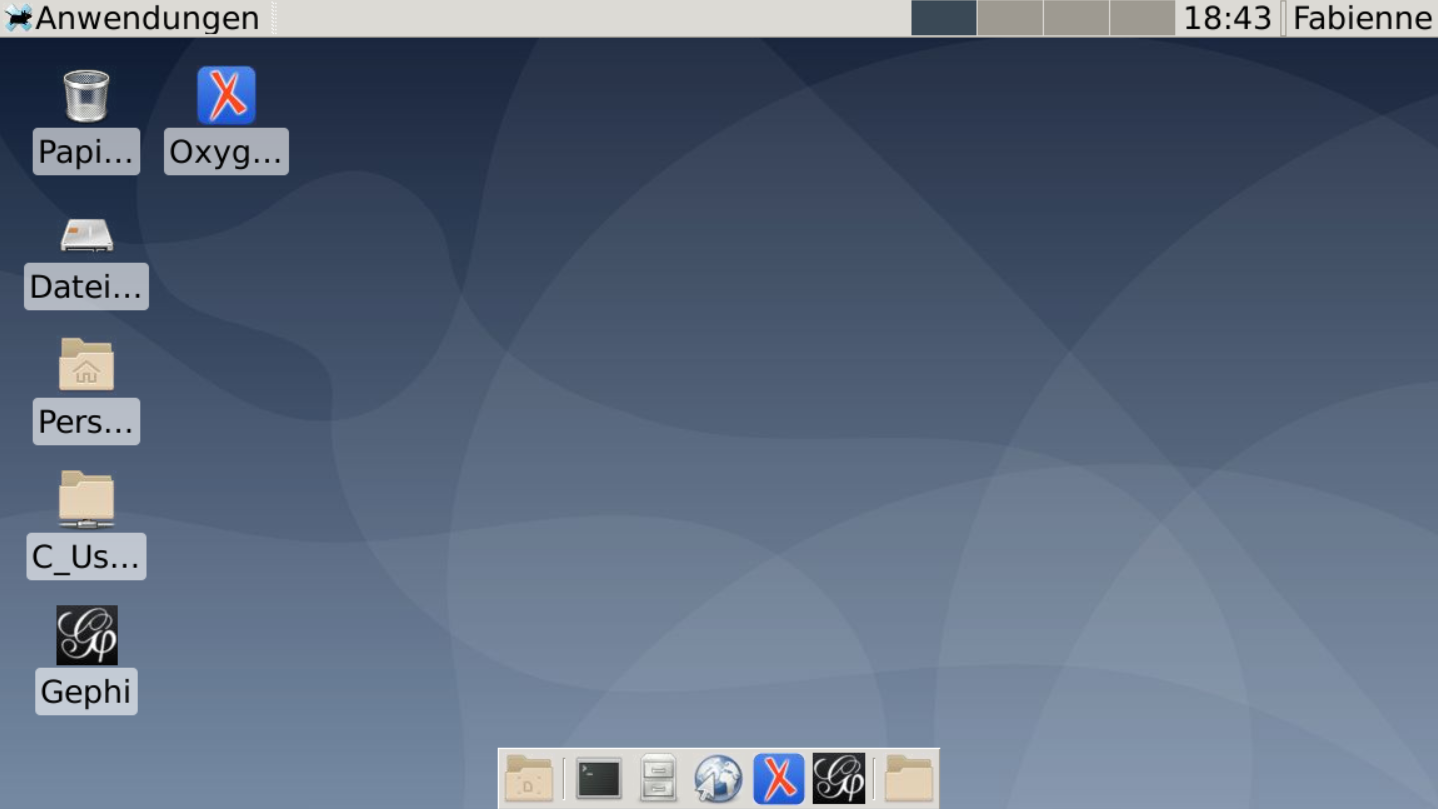
Figure 5: Example of higher dpi value You can define a shared folder (Figure 6). This folder allows data exchange between your home system and the Linux instance. The "smoothness" of this exchange depends on your upload/download speeds. Within the virtual desktop you can find the shared folder under /home/USERNAME/media/disk/.
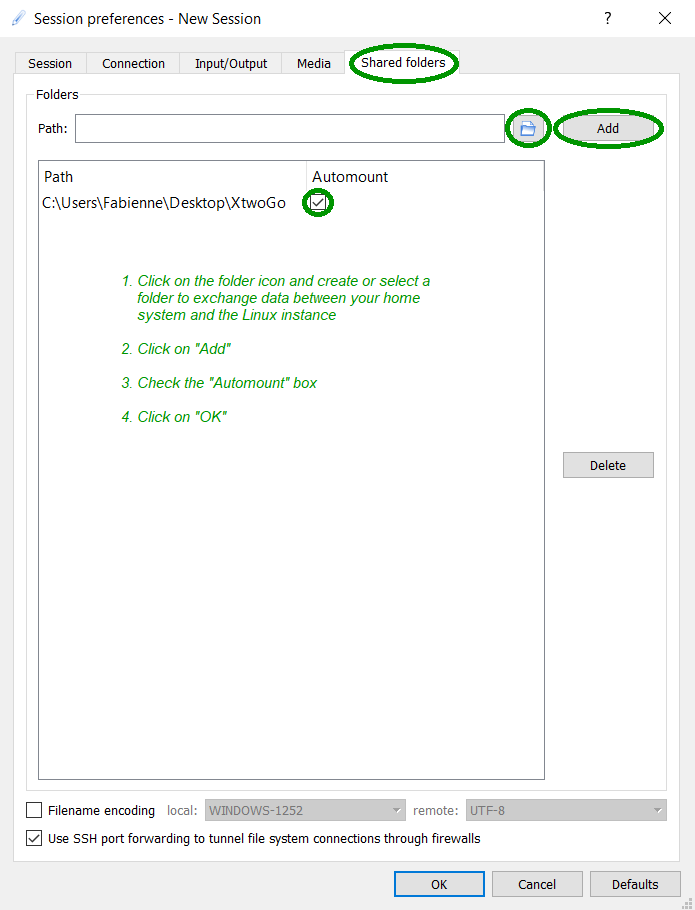
Figure 6: Shared folder You can find your created session at the top right. After entering your password (password prompt is triggered by a double click on your session), your instance will open in a new window.
Your adjustments of the display settings change back to "Fullscreen", or "Custom" after logout. "Maximum available" must be set before each use. Figure 7 shows where you can change your session preferences.
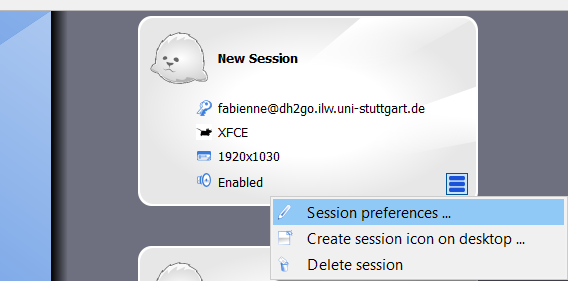
Figure 7: Change session preferences
Still in progress. Workaround: Use the installation instructions on x2go.org and the configuration instructions for Linux (see below).
Installation
For Linux systems based on Debian (e.g. Ubuntu, Mint) the X2Go client can be found in the repositories and be installed via the package manager (aptitude, Synaptic, etc.). If your Linux system does not provide the X2Go client via package management, the X2Go manual provides various instructions.
Configuration
Main Configuration
Not many settings are required to configure the client.
Start the X2Go client
Create a new session: Menu item "Session" → "New Session".
Define the following settings in the first tab "Session":
- Session Name: Any name
- Host: dh2go.ilw.uni-stuttgart.de
- Login: Your username
- SSH Port: 22
- Session Type: XFCE
Further Settings
With further settings you can adjust the screen resolution of your DH2go, activate the clipboard for data exchange between your home system and your DH2go and define a shared folder.
Adjust screen resolution: A little trial and error may be required
- Go to the "Input/Output" tab
- Activate the fullscreen option or set the desired screen resolution
- On Windows computers, full screen has led to crashes so far, so the windowed mode is recommended
- If windows seem to be scaled too large (menu bars are huge), you can increase the dpi (dots per inch) in the "Input/Output" tab (the size will be reduced)
- In running mode you can switch to full screen with the key combination Ctrl+F (and back again)
Activate clipboard (tab "Input/Output"): If you want to transfer files, text and other objects via the clipboard of your system to the server and/or from the server to your system, you can select the corresponding option here.
Adjust keyboard layout ("Input/Output" tab): If you have trouble with the key assignment in your DH2go, you can adjust the keyboard and keyboard layout you use here.
Define shared folder ("Shared Folders" tab): Here you can define a folder that you can access both locally and in your DH2go.
- Go to the "Shared Folders" tab
- Select a folder on your local computer
- Check the box in the "Automount" column
- Voilà: The folder is availabe on your DH2go under the path /home/USERNAME/media/disk